
Craft n' Connect
Co-designing to create enjoyable, dementia-friendly gameplay.
Working alongside residents with dementia, living in long-term care home Banfield Pavilion. Collectively designing a functional game to enhance connection and socialization through its use by residents, staff, volunteers, family and visitors.
* Craft n' Connect was selected to be exhibited in Emily Carr University’s Health Design Lab Showcase in April 2024 as part of the Perspectives Program: Storytelling through Co-design with People Living in Long-Term Care
Industry: Healthcare, Dementia Care, Game Design
MY ROLE
I worked on this project as the primary researcher, helping shape the design and development of the game. I was responsible for workshop facilitation, user testing, illustration, and content writing.
Team:
Neharika Sidda, Jasmine Wong, Sunnie Sun
Role:
Primary Researcher, Workshop Facilitator & UX/Content Writer
Duration:
January - April 2024, 4 months
Tools:
Miro, Google Docs, Adobe Illustrator & InDesign
Skills:
Research, UX Writing & Testing, Illustration, Workshop Facilitation
1.
UNDERSTAND
2.
DEFINE
3.
PROTOTYPE
4.
DESIGN
5.
BUILD
Overview
The Problem
Social connection is essential in long-term care homes. How can design contribute to enhancing connection and socialization between those living in long-term care home facilities?
The Solution
Practice participatory co-design methods, in designing to enhance the quality of life for people living in care. Learn and design alongside those with lived experience.
The Outcome
A board/card game co-designed with residents, staff, and volunteers at Banfield Pavilion over the course of 4 months. The game has a heavy focus on accessible gameplay and simplifying information for game facilitators.
Phase 1 - UNDERSTAND
Consent
Before our first visit to Banfield Pavilion, we began with familiarising ourselves with consent procedures and having consent forms for our resident co-designers to sign.
These consent forms covered details such as usage of residents’ names, work, and details, in our projects and for publishing.
Residents were explained the scope of our project and terms in the forms by staff and caregivers before providing signed consent.


Phase 1 - UNDERSTAND
Co-Designers
Introductions
Our first visit to Banfield Pavilion consisted of ice-breakers and getting to know our resident co-designers.


Long-term memory is often stronger than short term memory in older adults with dementia, which was the demographic of our group.
As such, our ‘getting-to-know’ activities asked about backgrounds and stories to share in regards to hometowns, families, hobbies, careers, etc.
Gatherings & Insights
Through the next couple visits, we were able to narrow down some key details between our resident co-designers to find commonalities to form a direction for our project.

We introduced games and activities to play within our group in order to gauge responses & engagement. With each of the games we introduced, we also assessed how well they play in a group setting.


Games & activities we tested include:
Qwirkle
Origami
Uno
Cards
Pen & Paper: Drawing & Writing
Picture Bingo
Playdoh
Charades
Of these games & activities, we noticed that our group of residents seemed to be most receptive to verbal communication, simple instructions and tactile experiences, such as using playdoh.

Phase 2 - DEFINE
Ideation
Using our insights about:
1
&
2
Our group's interests & commonalities
&
The games/activties with the best engagement,
we brainstormed game concepts that incorporated our ealier activities of questions & prompts to create a game that served as a space for sharing stories & conversation.

These initial Ideas included visual experiences and rouletter inspired gameplays:


Phase 2 - DEFINE
Solution
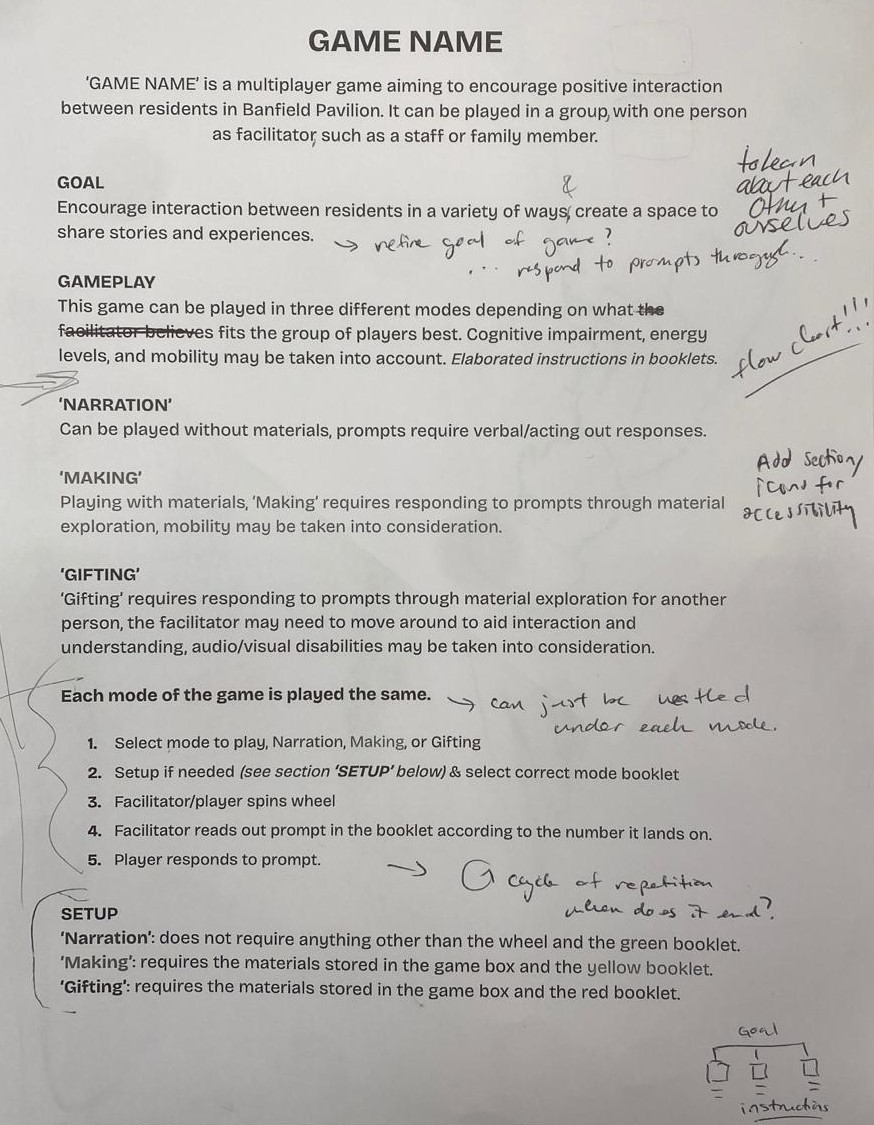
Based on observations of our group dynamic during our visits to Banfield, we wanted to create a solution that was attentive to the diverse group of individuals that we were co-designing with. Following this, our group’s aim was to accommodate for different levels of cognition, energy, and mobility, this goal became central to building our solution.
This goal was reflected in the gameplay through ‘modes’, different ways of playing the same game, with the same goal.
We designed 3 variations of the same game to include any type of player, regardless of individual energy levels, cognition, and abilities.
Mode 1: Narration
'Narration' is meant to be played with verbal directions from facilitators, with the prompts being read out and verbally/gesturally answered.
This mode is meant to ease the pressure of encouraging interaction between players and caters to nearly any level of ability.
Mode 2: Making
'Making' is played through the involvement of tactile materials from the box such as pipe cleaners and play doh to create players' answers to the prompts.
'Making' was created through our observations of how receptive our co-designers were with materials introduced to them.
This mode is adaptable to mobility-based disabilities and encourages tactile interactions.
Mode 3: Gifting
The final mode, 'Gifting' is meant to encourage interaction between players.
'Gifting' was created due to our co-designers' receptiveness to the act of gift-making and giving, and unlike the other two modes, involves players to respond to the prompt through interaction, by making the answer of another player.
This mode may need more attention from facilitators to ensure players are able to comprehend one another.
Introducing the same game through three ‘modes’ or ‘levels’ helped make the gameplay much more accessible, and relieves the pressure that facilitators may feel in encouraging interaction through a game instead of whichever means of communication were previously used.
Phase 3 - PROTOTYPE
Prototyping
Our co-designers indicated their preference for roulette, poker & card games, therefore we modelled our working game prototype following these interests.


The working prototype consisted of a spinning wheel-of-fortune-like circular box with compartments inside to store materials our co-designers had been communicating with during our early phases & instructions.

Pamphlets


Prompts


Instructions
The instructions consisted of our 3 modes designed into 3 pamphlets and our prompts in a separate sheet.
Phase 3 - PROTOTYPE
Testing
Ahead of testing our prototype, I set the following goals/inquiries for myself:
Inquiries & Observations:
Is the game fun?
Does the game promote interaction between residents?
Who are facilitators? Do they understand the game?
What other information needs to be included?
This helped create a benchmark for what our game needed to address before moving to the next phases.

During our next visit to Banfield, we tested our working prototype.
Our group enjoyed playing the game and we were able to confirm that our modes helped in bridging interaction between residents, especially the third mode, 'Gifting' which residents were extremely receptive to.

Our prototype also revealed certain problems and inconsistencies, mainly pertaining to the comprehension of gameplay, and instructions. Instructions were not being prioritised during this stage, leading to the comprehension problems we faced.
Based on the inquiries posed before testing, I then set the following goals to refine the gameplay after having tested our prototype:
Goals:
Ensure instructions are comprehensible
Residents are able to understand instructions given to them
Make the purpose of the three modes clear to facilitators

Phase 3 - PROTOTYPE
Gameplay
The goal in creating the instructions sheet for Craft n’ Connect was to have it be simple and comprehensive enough for a facilitator who has never played the game before to quickly understand the three modes and how to play each one.
To do so, I broke the game instructions into phases and worked on condensing this information with each iteration. The first thing I did was to categorise information crucial to the understanding of game instructions:
1. Three modes & why
4. Goal of the game
2. Co-design project info
5. Gameplay
3. Game setup
6. Restock instructions
Phase 4 - design
Design
Our co-designers; Cat, Jiren, and Robert, were involved in nearly every stage of conceptualising the design of Craft n' Connect and informed many of the details pertaining to the game.
We used our co-designers' common interests and experiences to pinpoint where and how they were able to contribute after figuring out Craft n' Connect's initial direction.

The following is a brief overview of some of the areas directly informed and inspired by our co-designers:
1. Game & Gameplay
Due to our resident co-designers’ preference for games such as poker and roulette, we focused on making our game follow this direction which led to our prototype of the wheel and our final iteration of it.


The gameplay of three modes is also based on our observation of the abilities within our group & in the care home through our interactions within Banfield, leading us to prioritise inclusivity through accessibility.

This table helped me summarise some of the main accessibility-related pain points I wanted to address through the integration of three playing styles of the same game.
2. Style
As seen in the venn-diagram above, our co-designers spoke of their shared interests in westerns and classics. When presented options for the visual design of our project; Art-deco, geometric forms, and pictorial motifs were most popular, which helped form our game’s art direction.

3. Colour
We made 5 colour palettes in the early stages of our project and asked our co-designers their favourite colours and which combination they preferred.


Deeper & muted colours, such as the reds, and greens starred below were consistent winners. Craft n' Connect's primary colours therefore consist of red, green, mustard, and black.

Phase 4 - design
Illustration
A fun area we included co-creation processes in, is Craft n' Connect's art direction, by involving our co-designers in creating illustrations to decorate the game box of Craft n' Connect.
Initial illustrations were based on our co-designers’ interests and commonalities; Vancouver, Gardens, Favourite animals (cats and dogs). I continually refined these illustrations based on feedback from our resident co-designers.
Garden

Pets

Vancouver

For the final side of our box, I led a workshop where I printed out the borders of the working illustration to show our co-designers and had them to draw illustrations to put on the box.

Border outline


Residents enjoyed the idea of having their work on the box and contributed their drawings. All of these drawings came with individual stories and recollections, making this project very personal, paying homage to the residents we co-designed with!


Phase 4 - design
Instructions
The challenge of completing the game instructions lay mainly in condensing information as much as possible, and proved to be one of the more challenging parts of my responsibilities.
The first couple iterations of our gameplay and instructions consisted of three pamphlets, each with instructions of its respective mode and prompts to match the level. Along with a single-sided A4 sheet of all the other game-related information.


These pamphlets needed to be revised for a variety of reasons including, lack of concision and the usage of in-accessible language ex. our levels of gameplay titled as ‘moderate’ and ‘challenge’ which may intimidate players.
While the pamphlets played a large role in our art direction, the information in them was redundant and unnecessary to the overall gameplay of Craft n’ Connect.
For the third iteration of the instructions, I worked on refining the written content and condensing all the information into a single, double-sided A4 sheet.
Side 1

Goal & Gameplay
Three Modes
Setup
Side 2

Re-Stocking
Options
Acknowledgment
Phase 5 - Build
Co-Iteration
The instructions lacked clarity so I refined them into a single A4 and decided to get insights from others. This process lay the foundation for reaching a solution to our instructions.

This sheet was distributed to peers, family, friends and professors to see how well the gameplay, intent, and modes were understood by those who had no relation to this project.
I had sit-down discussions and interviews with a wide range of people differing in ages and abilities to assess the game's comprehension before taking it to Banfield.

After having received all the input from those with no familiarity of the game, I received feedback from staff and volunteers working directily with our residents and the game at Banfield to find ways to refine and simplify the contents further.
These perspectives were the most important to consider as staff and volunteers of Banfield would likely be the main game facilitators moving forward.
Through all the corrections, edits, iterations, and testing, I was able to condense everything into a single, double-sided 6” x 6” sheet.
Side 1 - Front

Goal
Gameplay
Side 2 - Back
3 Modes + Setup for each Mode
Restocking instruction


Prompt card deck (used for all modes)
This final iteration utilized both sides in a concise way while also including all the key infomation identified as crucial, to play, understand and re-stock Craft n' Connect.
Phase 5 - Build
Considerations
The following are some design considerations crucial to the physical design of Craft n' Connect.


Game Box
The box was made to be deep enough to store most commonly used craft materials, including the materials we'd been testing & playing with throughout our time in Banfield.
Spinner
The spinner was built to be large enough for residents to comfortably spin it if they chose to do so.


Lamination
To comply with sanitisation measures at Banfield, all of our print materials were laminated for infection control.
Lamination protects the paper and ink against wear, moisture, other contaminants, and makes it easy to clean and disinfect the game as needed.
Acknowledgements
We included acknowledgement/credits to the inside of the box to commemorate our collaborative project.

Phase 5 - Build
Final
Craft n' Connect is curently being housed and played at Banfield Pavillion.
The game box contents consist of the following.

Craft materials for players to work with:

Deck of 16 cards with prompts to be 'Narrated', 'Made' or 'Gifted':

6x6" double-sided instruction sheet with; directions, modes, and recommendations to help restock the game:


